WordPress upgrade almost broke my blog!

Phew! I felt I learnt a lesson today… to follow instructions!

I was upgrading this blog to WordPress 2.2, and halfway along my installation process, along came an unfriendly error message that went something like this!

Allowed memory size of 8388608 bytes exhausted (tried to allocate 46080 bytes)

The main page of the blog was still up running, but I couldn’t access my back end. I couldn’t upgrade, I couldn’t add new posts… nothing! I thought that this was it!

Good thing I searched up the error message and found that it was not a serious issue, and I got into the WordPress forums, where someone else had the same issue a while ago.

Apparently, the upgrade script was trying to take up too much memory (beyond the default limit of 8MB), and it was because I hadn’t disabled my Plugins before my upgrade. You know the lazy me! 😛 So I had to log into the database backend (phpMyAdmin) to manually disable the Plugins, run the script, and then enable them again.

So now I see the reason why Matt and team tells us to disable the WordPress Plugins before we upgrade. You can be sure I’ll do that for my next upgrade, and also make sure I backup my database before I do any drastic changes to the installation.

Well, it always requires a lesson like this before someone learns, isn’t it?

WordPress Theme and Plugin developers, please document your code!

Over the past few days (actually it was on and off for the past few weeks!), I was spending a lot of time trying to optimize one of the popular themes provided in the WordPress themes directory. One of my clients wanted to have that look and feel of the theme… but the underlying code was not optimized for search engines. For example, they used the WordPress default “[BlogTitle] >> [PostTitle]” manner for titles in the single.php page.

So I thought I’d just dive in and get it tweaked.

I overestimated myself. The code was in the huge mess! I mean terrible! There were totally no documentation or comments on the CSS file, terrible indentation and lots of redefinitions of the same styles over and over again for no particular reason.

So my effort to “get it tweaked” was a waste. As some of you may know the nature of CSS – the effects cascade. One element goes out of way and the whole page is messed up! Argh. It was so frustrating!

Yesterday, I finally gave up tweaking. I decided I should build the theme from scratch again, and guess what – I took only two days to rebuild everything, with properly commented lines of what each CSS definition affects. It feels so much cleaner now.

WordPress Theme and Plugin developers, please document your code!

Yes. If you want to be part of an open source community, please do help others be able to expand on what you have already done, include proper documentation for your code please!

For most cases, people who have downloaded your theme would want to change small elements of it to suit their needs, like for example, changing the colour and style of a particular header, or adding some extra padding between elements, or add a widget to the sidebar, or things like that. Make it easy for people to do that.

If you maintain several themes, commenting might be useful for yourself! Have you ever gone back to one of your themes and then finding out “What did I mean to do last time when I created this line of code??” Save yourself that trouble of having to figure it out, by properly documenting your code!

How do you document your code? You’d ask.

WordPress theme and plugin developers primarily work with three languages.

  1. HTML
  2. PHP
  3. CSS

Here’s how you can provide documentation for each.

HTML

To create a comment line in HTML, leave the text between <!−− and −−>. For example, if to create a comment to indicate that the following code is a comment form, you might do something like this:

<!−− Comment Form −−>
<h2>Leave your comments below</h2>

PHP and CSS

PHP and CSS comments fall between /* and */. Additionally, for PHP, if you want to create only a single line of commenting, you can use //.

For example, in PHP, you can do this to indicate that you are calling up the search.php file.

<?php get_search_form(); //call up search.php ?>

or this

<?php /* This is a very long comment to call up search.php
search.php provides search functionality for the blog. */
get_search_form(); ?>

In CSS, you can do this, so indicate that the following style is used for the post title, for example

/* Using in single.php as the post title */
#content h1 { font: bold 14px Verdana, Arial; color: #ff7800; margin: 0px; padding: 0px 0px 5px 0px; }

How much should you document?

There is no rule to say what you must document, and what you should not. I do my best to document everything! If you look at my own CSS stylesheet, I have comments for every section of CSS code.

Indentation

Proper indentation of your code helps your readers read your code easily – it provides a hierarchy to your code. As programmers and HTML source code designers, we work with a lot of nested conditional tags like if, while loops, for loops etc. Proper indentation tells the developer looking at the code exactly where each structure ends.

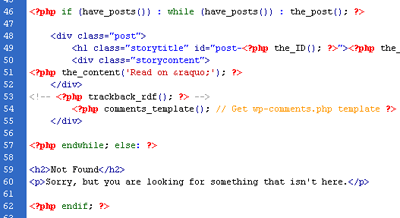
Let me illustrate using a very simple example.

Does this look easier to read and understand?
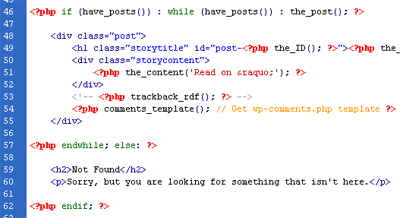
Lousily Indented Code

Or this?

Well indented code

Obviously the second illustration right? The start and end of each structure – if… else… endif and HTML divs fall on the same line. Just look at line 52 on the first illustration, could you tell immediately that the ending </div> was for the “storycontent” div and not the “post” div?

I thought these things are the fundamentals of programming and very much common sense. Heh. I guess common sense really ain’t so common afterall! 😉

So please, WordPress Theme and Plugin developers out there, I really love all your stuff, adding so much more functionality to make WordPress such a wonderful system to use, but please, examine your code, make it easy for people to continue the work on what you have already done!

5 great reasons to use WordPress sidebar widgets

Sidebar Widgets
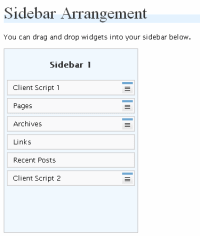
Ah… widgets! These teeny weeny yet extremely powerful pieces of code that allow you to practically manage your blog easier than if you were playing scrabble – simply lift piece off your palette and drop them on the desired position on your sidebars, and everything else just flows in place. Click “save changes”, and wallah! Your sidebar is generated automagically for you.

Perfect. I’m sure pre-school teachers would really appreciate it if they could line up their kids the widget style. 😉 I simply love them! erm… I mean the widgets, not the bunch of noisy pre-school kids. :mrgreen:

Here are five great reasons for you to get started with widgets!

1. Its not that tough to configure afterall!

Don’t let all the technicalities of configuring drag and drop stuff stop you. Wigetizing your WordPress sidebar is pretty easy. Download the plugin, configure 2 files, upload them all, and you are ready to go. There is a great FAQ page to guide you through the process.

2. Configuring things using your browser makes it so easy.

Yeah, you don’t have to deal with all the HTML code any more! Drag, drop, configure and save changes. You’re done. No more need to search for the right code to copy, right position to paste, right file to upload and things like that. I know, some of you like these things (I’d secretly admit to that too – tweaking HTML code keeps me awake all night!), but no, definitely not when you start to get more websites up. If drag and drop can do the same, its time for me to let go.

3. The configurations and settings are stored in your WordPress database, not your theme files

One brilliant thing I love about widgets is that most of the configurations and settings of these things are stored in the WordPress database. This means that when you use the same theme on another blog, you will not accidentally use the same StatCounter code and mess up all your statistics by accident. Ever had that happening to you before?

4. Like it or not, the newer themes are widgetized

At least, that is what Matt said in the FAQ page.

… We’re making this plugin available now to see how the WordPress community likes it and to give people a chance to write widgets. If all goes well, this feature will be integrated into the standard WordPress distribution and any themes that don’t support widgets will, if you believe our crystal ball, become very unpopular very fast.

We’re sorry if that seems threatening. It hurt us more than it hurt you.

This will probably mean that there will be more standard Plugins today that will migrate to widgets as we go along. If you want to keep your Plugin functionality, you need to welcome the widget. Don’t like it? Go dig the code yourself. 😛

5. The functionality is endless

Thinking from a technical standpoint, widget technology is wonderful. Think out a little! You don’t have to stick widgets to sidebars. You can define a “dynamic_sidebar” practically anywhere on the page – how do you like configuring your blog header and footer, widget style? Don’t like a graphic? Drag it out. Like the search bar in the header, drag it in.

Of course, there are WordPress themes already doing that, you say… but themes are supposed to be “look and feel”, and besides, its a whole bunch of code, most of the time, which I haven’t taken time to figure out yet. Widget technology will help themes to stay really lean, and strictly to the look and feel.

Are you WordPress wigetized yet?

Add Additional Quicktags to Your WordPress Editor!

Are you using the default (non-WYSIWYG) editor for WordPress? Well, if you are, is there any HTML code that you frequently use, like a certain HTML header, or adding a signature to your blog post?

Well, I do! And what I have found and implemented for my blog this week is the wp-addquicktag plugin to add several of my frequently used HTML code to the editor.

For example, for this blog, I have dedicated a the HTML H5 header to use as subheaders within my posts. I have configured CSS styles to align my images to left and wrap the text around the image using the CSS float attribute, and I use these really frequently in my posts. Now, I don’t have to go to the hassle to type class=”postimageleft” after I have added the image. Its done in one click!

Here is what configuring wp-addquicktag plugin looks like.

Add quicktags!

Its really easy to configure and use! After uploading and activating the Plugin, simply go to the configuration page where you can fill in the fields below to add or edit the quicktags – the button text, the start tag and the end tag… and its done!

Love it to the core! Here’s what my WordPress post admin screen looks like now :mrgreen:

WordPress post admin screen

For the more experienced WordPress user – While I was looking for this solution, I also came across another page which teaches you how to add some code into one of the javascript files in the WordPress installation to add a quicktag. While this method is a little tougher, and you will have to reconfigure it whenever you upgrade your WordPress installation, it allows you to configure the quicktag button’s access key, which is not provided with the Plugin.